Published
May 5,
2017
The Final Touch: Post Production of UW Images (Part 10: Proper Exports)
This is the last part of the series! We have worked a lot on white balance settings, basic and advanced exposure corrections, contrast & curves, advanced techniques of removing color casts, basic & advanced retouching, final color boost, cropping and sharpening.
Finally, our image is ready! And now, we arrive at the question: What do I do with it? How do I save it for further editing, or how do I create final files for Facebook, websites, and printing?
The good news is if you did your entire image processing in a RAW converter such as Adobe Camera Raw or Adobe Lightroom, you have nothing to worry about, regarding keeping your work files. Editing RAW files is non-destructive and your original photograph is never altered. You can always go back to "zero", improve your postproduction, try something new, or start from scratch (without loss of quality).
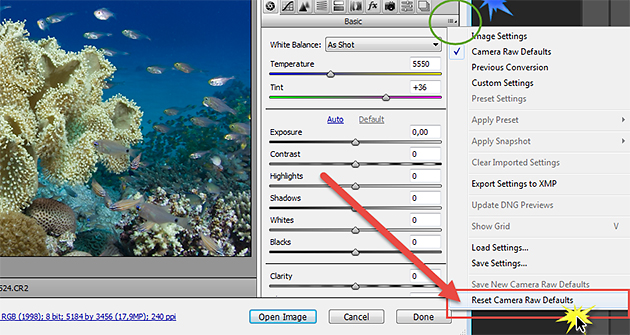
In Adobe Camera Raw, just open the options menu at the top-right of the "Basics" module (green circle) and select "Reset Camera Raw Defaults". Your previously edited RAW file will then reset to its original state. Alternatively, you can manually set altered values of exposure, contrast etc. back to "0", just in case you do not want to completely revert back to the starting point. See below:
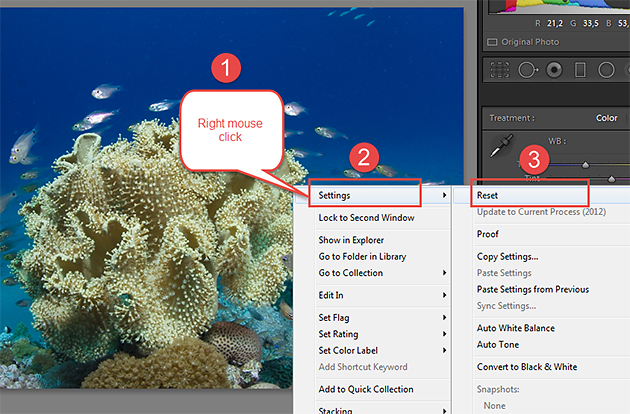
In Adobe Lightroom, you can access a sub-menu when doing a right mouse click in the image itself (in Lightroom's development module). Select the "Reset" options in the "Settings" sub-menu and your RAW image will get set back to "0".
In case you've done more editing in Photoshop and maybe want to return to that work file later, it would be wise to save that file and all layers as Photoshop PSD files. Only this file format provides the opportunity to modify, change, or alter your former steps of postproduction in Photoshop.
How to export any ready, edited image pretty much depends on the planned usage.
Exporting Images for Facebook and Web Pages
Our original images are way too large for internet usage, and their RGB color space is not ideal for the majority of Internet browsers. So we'll need to downsize and optimize them for web presentation. That's easy!
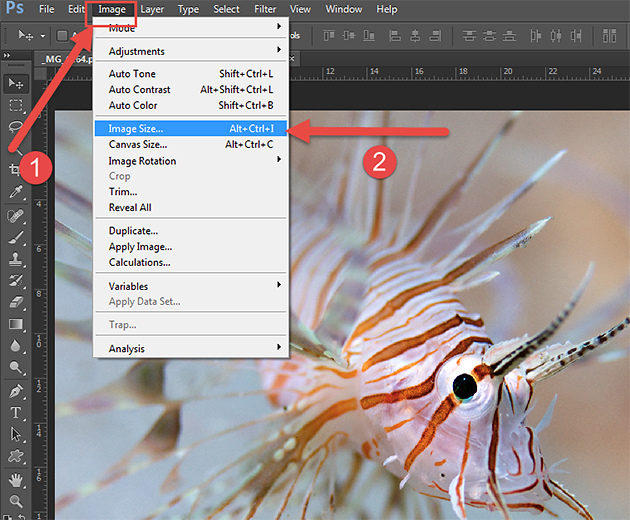
1 – Go to "Image" and select "Image Size":
2 – Let's consider that we want to export this image for sharing on Facebook. In the upper field, called "Pixel Dimensions" (red area) I have changed the width of the image to 960px. As long as "Constrain Proportions" is checked (it should be), Photoshop alters the length accordingly. I leave all the rest as it is. See below:
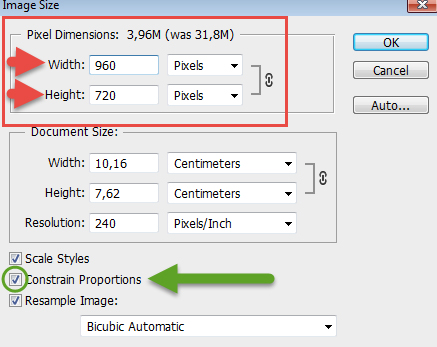
There are easier ways to do this but I am using this one for a special reason: re-sizing images always comes with a slight loss of sharpness. But we want our images to look as great as possible, and no minute is ever wasted if you are striving for the best ;-)
3 - So, after downsizing the image, I add a little tiny bit of sharpness to it once again, just to equalize the sharpness loss due to re-sizing. An amount of 25-40 with Radius of 0.5 to 0.7 and a Threshold of "0" usually does a good job here.
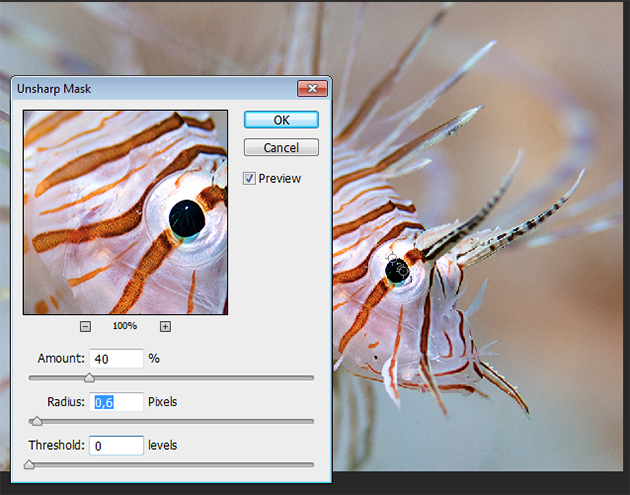
4 - Now it might be a good idea to write your copyright/ signature in the image by using Photoshop's text tool. Never forget this step when preparing images for web usage.
5 - The rest is easy. Just go to "File" > "Save for Web" and check that the checkbox "Convert to sRGB" is activated.
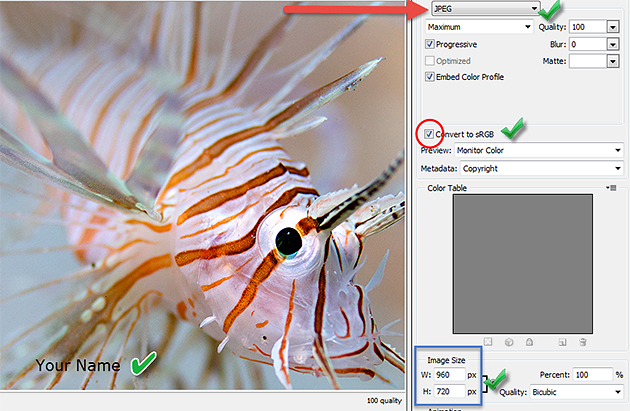
6 – Finally, close the PSD file, and then when Photoshop asks you, "Do want to save the changes?" you select, NO! Otherwise you would overwrite your full size original Photoshop file with a downsized one.
Exporting Images for Printing
Printing digital images is a small science on its own... and I am not talking about our home printers.
First of all, digital cameras produce images in RGB color space. Screens of all kinds (including TV screens and beamers) display images in RGB, but printers print in CMYK color space. There are a few magazine editors who could cause a headache for you by requesting weird file formats in CMYK color space. We, of course, could do it but we would be never able to fine-tune the color management of our image according to the printer devices used by professional printing companies. This final fine-tuning (called "proof") can only be done at the place where the image is printed.
While low-cost printing services are happy with a JPG with lowest compression (Level 12) and in RGB color space, professional prints require files that come with as much image information as possible. Saving your image as uncompressed TIFF or uncompressed PDF ensures that the very best possible file gets sent to the printing company or publisher.
To do so, you just need to go to "File" > "Save as" > "Format" section of the menu, and select "TIFF" or "Adobe PDF".
Last tip: When finalizing images for later prints, you always need to slightly over-sharpen them, as a slight loss of sharpness is a side effect of the printing process.
Happy bubbles, happy diving, be safe... and it was my pleasure to introduce you to some basic steps of image postproduction :-)
Further Reading
Back to Part 9 - Sharpening
Featured Posts
-
Please "Like" My Photo!
Once you've made some cool underwater shots, you would love to have more people notice your photos, for example by sharing them on Facebook. A path full of potential but lots of nasty obstacles on the way. Let's have a look!
-
Reef-Art: Looking at the Reef...
Reef-Art shows fascinating insights to an underwater world, 99% of the divers never see. Reef-Art is the "Fine Art" of macro photography. It's a passion! The passion to bring your audience something they don't expect, they h...
-

Underwater Photography: Shoot...
Are you ready for huge perspectives in your underwater photographs? Wide-angles are fine but do you want it even wider? Time to check out underwater panorama photography!


Load more comments