Published
Feb. 3,
2017
The Final Touch: Post Production of UW Images (Part 5: Fixing Color Casts)
A color cast is a tint of a particular color, usually unwanted, which affects the whole photographic image evenly.
Even though white balance settings or adjustments are still the "golden key no. 1" in fighting color casts, in some cases, a finer adjustment is necessary in post production, especially when the scene/subject in our image is lit by two different light sources (e.g. strobe-light and sunlight, as they have different KELVIN values).
This tutorial refers to Adobe Photoshop CS6 but works with CS 3,4 & 5 as well.
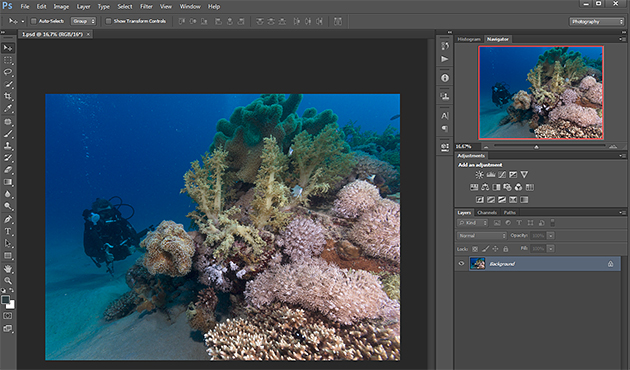
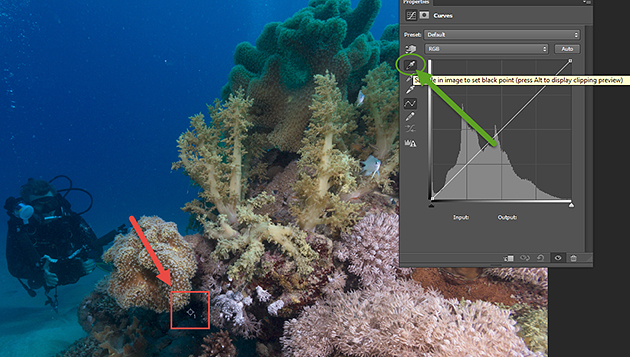
Let's start with a shot I made during one of my UW Photography workshops in the Red Sea. I've adjusted the white balance and a few exposure corrections in Adobe Camera RAW and have now opened it in Photoshop CS6 for (regarding colors) a "final touch":
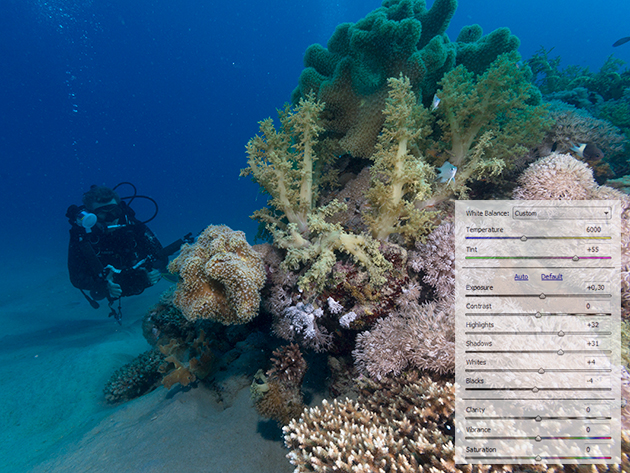
Even after adjusting the white balance in Adobe Camera Raw, I still sense a few problems, caused by color casts.
We can’t judge an image without examining it and when it comes to post production, we should take very close looks. I divided the image into a few "zones", just to visualize where to look:
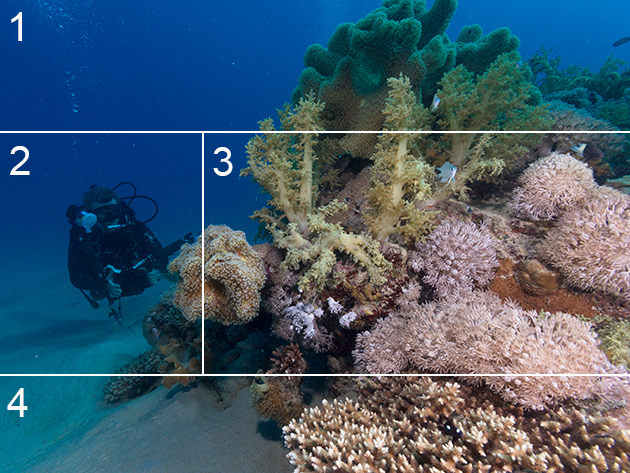
1: The water looks OK, but the soft corals to the right don't- lots of green and cyan.
2: The sunlight, not the strobes, lights the diver. No problem, it can stay like that!
3: The main action goes here. Beautiful soft corals, but they suffer from some color cast. There is cyan (and some magenta) where there shouldn't be any.
4: A cyan color cast here. The sand area close to the corals can be optimized.
Some areas in this image can't get fully "repaired", as they were lit by the sunlight only, which, considering the depth of 15 meters is insufficient for achieving proper colors (see the right half of area "1").
So, what can we do? Photoshop offers a few "auto" functions such as "auto color", "auto tones", "auto contrast" and also "auto curves". First of all, any automatic corrections are surely worth a try, but rarely end in pleasing results when it's about editing UW images. See some "negative examples" here:
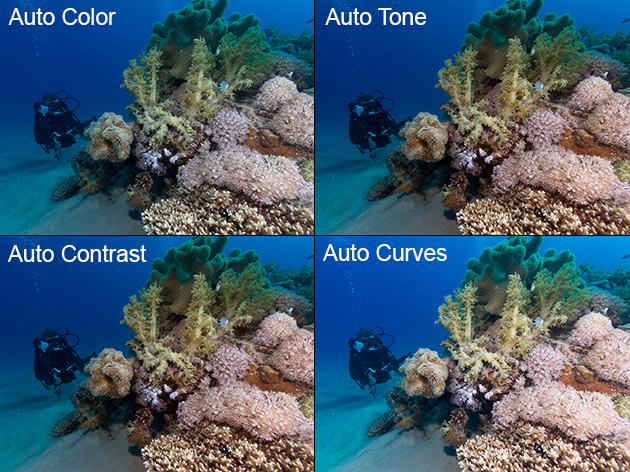
None of those auto functions really helped, but, regarding colors, the "hope" lies in the curves. Let's see how to improve this image by editing those manually.
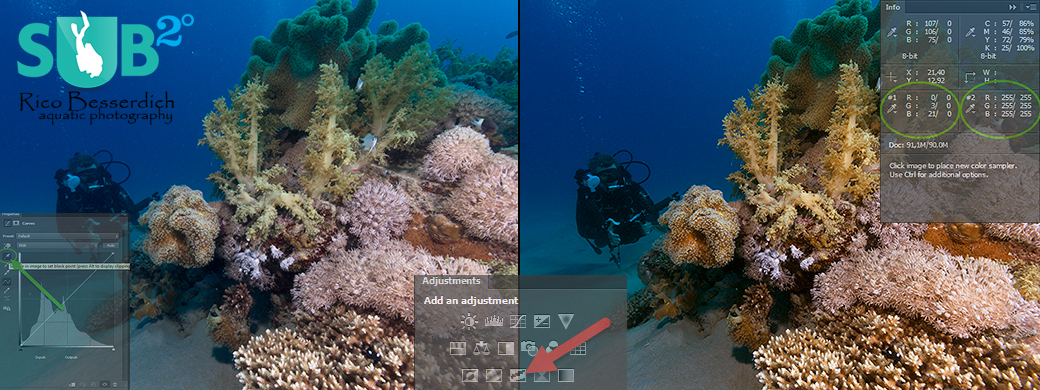
1st: Open your image in Adobe Photoshop
2nd: Create a "threshold" adjustment layer by clicking on its icon in the adjustment layers section to the right. Don't be afraid if your image looks weird for a short while, it's for its own good ;-)

3rd: Select the Color Sampler Tool at Photoshop's left-sided tools menu.
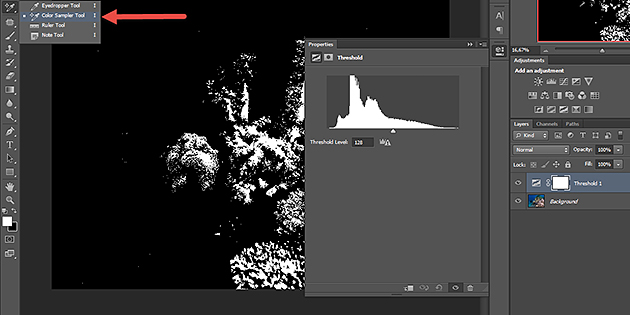
4th: Move the small slider in the threshold layer window completely to the left and then to the right again, until a black area appears in the image.
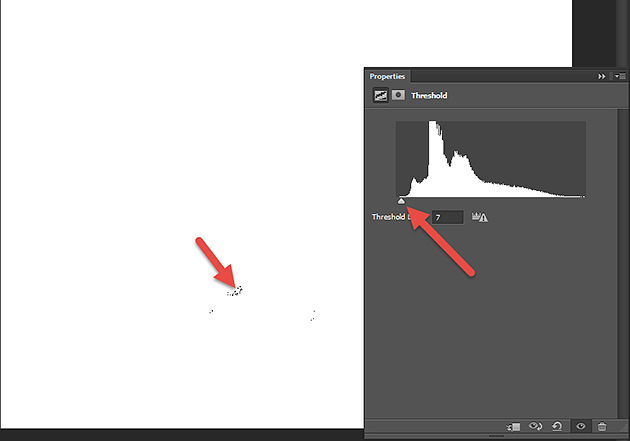
5th: Zoom into the image and place a color sample by clicking in that black area.
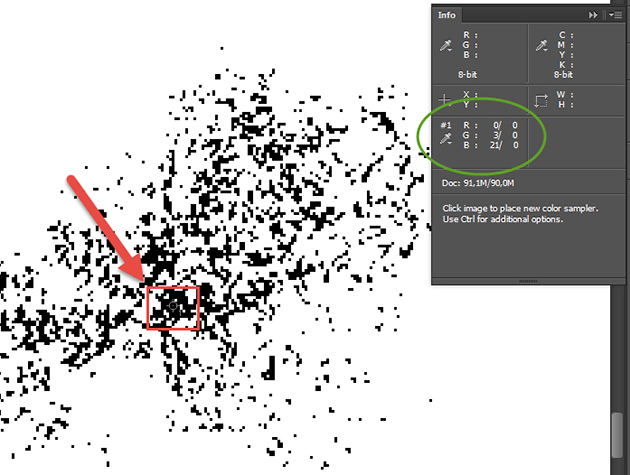
You now have a small color pick with a "1" beside it. Check the info screen to the right: As we just picked the black point, it is supposed to be 0 but it is not. A green (3) and blue (21) color cast are in the blacks. Good to know ;-)
6th: Now, go back to the threshold adjustment layer, move the small slider to the right and then back to the left until you spot a first white point. Zoom in and click with the color sampler in this white area to pick a second sample.
The info screen now shows you the values of our 2 color samples:

Color picker sample 1 shows a green & blue color cast (all values are supposed to be "0”) in the blacks while picker no. 2 (which counts for the white point) is just fine, as "255" is the ideal value.
7th: Delete the threshold adjustment layer; we don't need it anymore.
8th: Create a curves layer (from adjustment layers panel). Grab the 1st sample pipette in the layer's info screen, locate your former placed "color pick no. 1" and click in it. Be precise (you’ll need to zoom on to make a correct pick).
After, grab the third (not second) pipette in the curves screen, locate your "color pick no. 2" and click in there.
The result:
This is the most precise technique to get rid of subtle to intermediate color casts in underwater images with mixed light.
If you’re still not satisfied with the result, you could use the second pipette in the curves window and place it freely on an area with neutral grey. Sand often works well and so do stones. In this tutorial example I did that, clicking with the second pipette in the sand area in the sand area left to the lower right coral. This step is, in most cases, unnecessary, but here it resulted in a slight improvement.
Please note that in post production, "many roads lead to Rome", which means there are plenty of different workflows and ways on how to fix specific problems in an image.
Further Reading
Continue Reading Part 6a- Retouche Basics
Back to Part 4 - Essential Adjustments: Colors
Overview of Scuba Diving in Egypt
Overview of Scuba Diving in Dahab

Featured Posts
-
Please "Like" My Photo!
Once you've made some cool underwater shots, you would love to have more people notice your photos, for example by sharing them on Facebook. A path full of potential but lots of nasty obstacles on the way. Let's have a look!
-

Reef-Art: Looking at the Reef...
Reef-Art shows fascinating insights to an underwater world, 99% of the divers never see. Reef-Art is the "Fine Art" of macro photography. It's a passion! The passion to bring your audience something they don't expect, they h...
-
Underwater Photography: Shoot...
Are you ready for huge perspectives in your underwater photographs? Wide-angles are fine but do you want it even wider? Time to check out underwater panorama photography!
Load more comments