Published
Jan. 20,
2017
The Final Touch: Post Production of UW Images (Part 3: Essential Adjustments, Contrast and Curves)
Flat-looking images share one common problem: insufficient contrast.
Of course, the best way to prevent contrast problems is "in the camera", basically by doing it the right way when shooting the pictures. But there are images that aren’t that bad and can be improved using slight contrast adjustments. Again, RAW or DNG are the ideal file formats to work with.
Before grabbing the contrast slider or manipulating curves in Photoshop's ACR (Adobe Camera Raw) or Lightroom, a general understanding of what contrast is helps us make a fine post production that gives an already good image the final kick.
In photography, contrast is the difference between dark and light; the larger the difference between dark and light areas, the greater the contrast. In very simple words, boosting the contrast in digital postproduction turns bright areas of an image brighter and dark areas darker. The same counts for colors and tones. Everything is about light.
Increasing contrast in digital postproduction should be done carefully and subtly, using very gentle steps. Over usage can destroy the image.
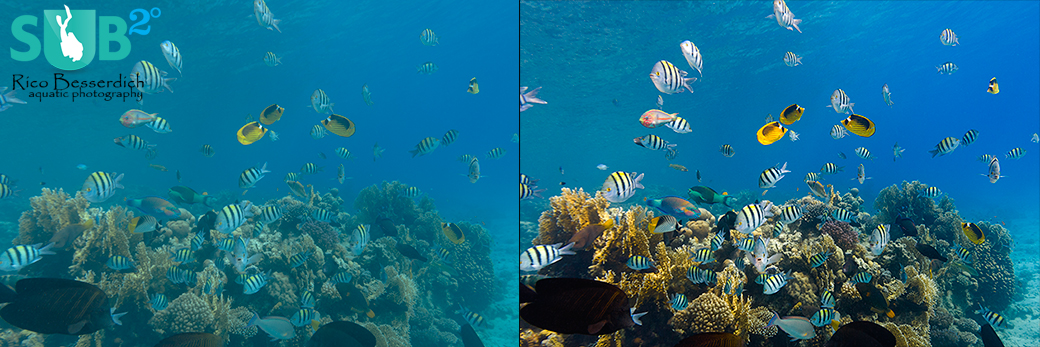
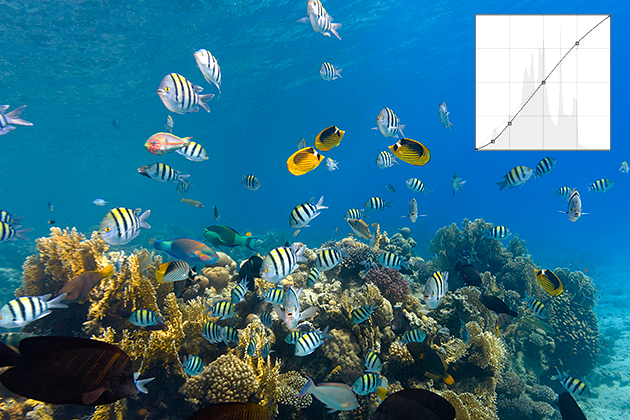
Now, let's look at a snapshot I took in the Red Sea while snorkeling:

A quick white balance and a very slight exposure correction altered the above image into this:
However, even though the image now appears more colorful, it still looks sort of "flat"- obviously a contrast problem. Let's see how we can fix that!
The easiest way is by using the contrast slider in ACR or Lightroom that is placed directly below the exposure slider. Moving the slider to the left reduces contrast, while moving it to the right increases it. And yes, extreme alterations cause extreme results.
Let's have a look at two extremes:
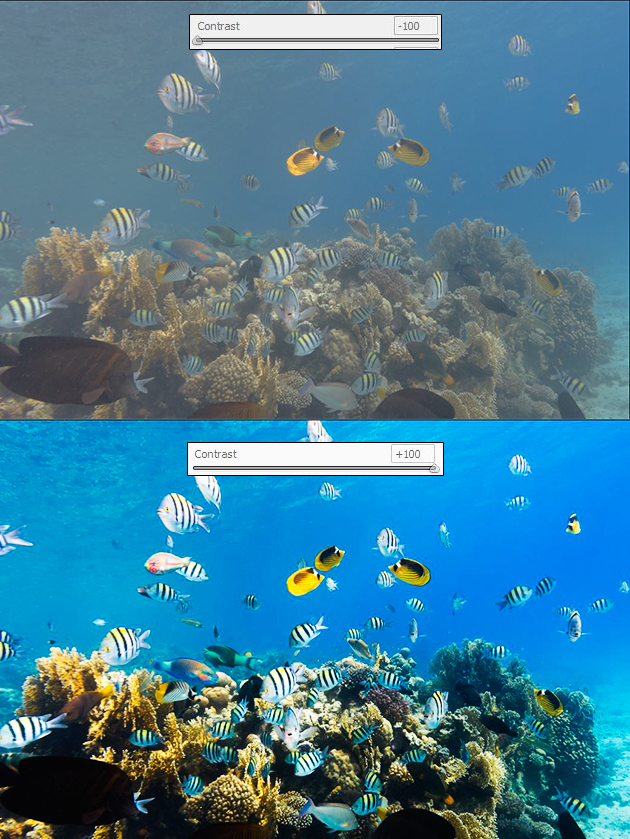
You might believe that moving the contrast slider to the max (+100) improved the image a lot but, while we might have increased the contrast and made the image look "better", we actually generated a lot of new problems.
As a simple rule of thumbs: do not overuse it. Always take subtle steps and fine adjustments and always keep your eyes open for the finest details in bright areas, dark areas, and in colors too.
Not convinced yet? Well, then you'll need to face my "contrast horror show" as a cautionary example:

All pictures in the above image are completely ruined by adding too much contrast. Bright tones went brighter, dark tones went darker, colors morphed into psychedelic. The results are terrible, even though they might now have maximum contrast.
After realizing that the notion of "a lot helps a lot" might be not be the ideal way to go here, let's take a critical look at what went wrong in the tutorial image after boosting contrast:
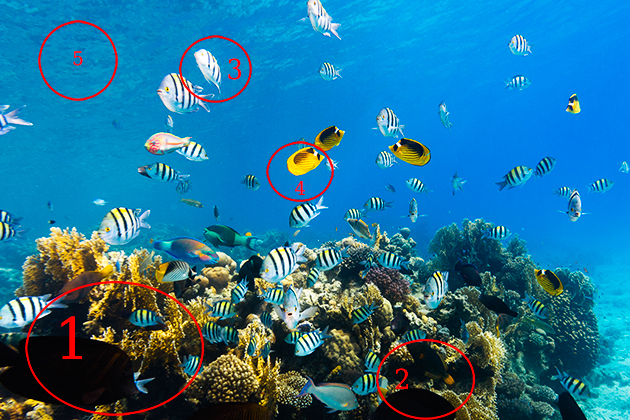
Zones 1 and 2: we lost almost all details of the shadows.
Zone 3: we lost details in the bright tones.
Zone 4: the yellows are clipped.
Zone 5: the color of the water looks unrealistic.
Conclusively, as the contrast slider increases the overall contrast of the image, the result might look "better" as a first view, but when looking at details- and we should- our eyes catch lots and lots of mistakes.
For demonstration purposes, I've used extreme examples, of course. However, whatever you do, always slide the contrast very slightly... or don't move it at all, as we can use curves for a way finer contrast adjustment :-)
Curves are versatile, powerful, and scientific. Therefore, I only refer to what curve alterations can do to improve contrast. Modifying curves is the most powerful tool for adding contrast and making an image pop, way better than the contrast slider can. Furthermore, curve alterations are the top tool for adjusting tones to brighten, darken, shift colors, and turn your image into a "better not eat these sort of mushrooms" piece of contemporary art ;-)
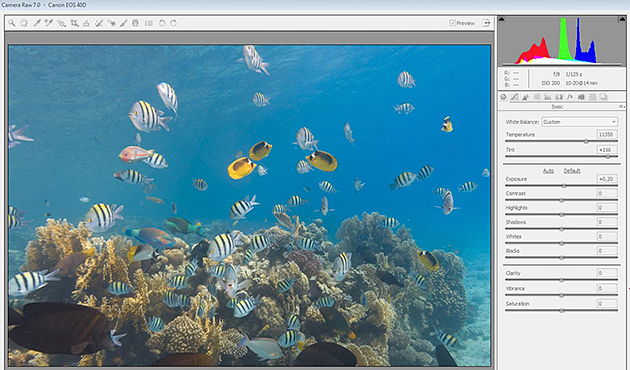
Curve controls are found in ACR by clicking on the "tone curve" rider at the top right (second icon). In Lightroom, they are found below the "basics" chapter to the right.
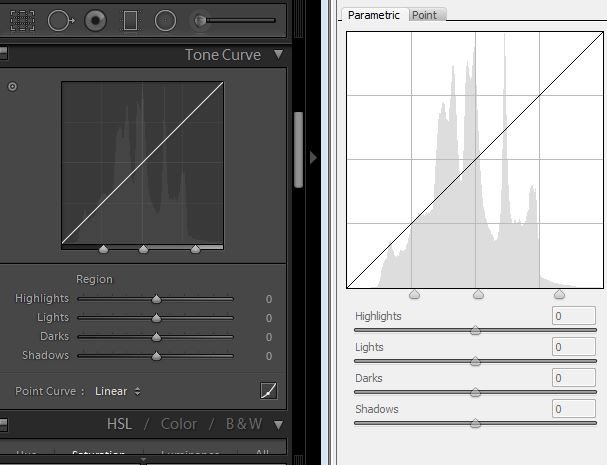
[Left: Tone Curve control in Lightroom. Right: ACR]
As there are plenty of options here, you may choose one of the presets (linear, middle or strong contrast) and make fine adjustments from there. There are plenty of more options, but for starters I'll keep it simple.
The classic way to improve contrast is the "S" curve, where- after your alterations- the diagonal line in the curve controls window ends as an "S" shape. A more pronounced S-shape gives a greater effect to the image's contrast, and makes the image pop.
By applying the "strong contrast" preset and slightly moving the points in the curve for fine adjustments, the image now looks like this:
In the end, always check the results of postproduction closely and carefully; the devil hides in the details! Curves might look a bit difficult to understand and use at the beginning, but they provide much finer and accurate options to improve contrast of an image than the contrast slider. The good ol’ "S" curve is a great place to start with! :-)
Further Reading
Continue Reading Part 4 - Colors
Back to Part 2b - Advanced Exposure

Featured Posts
-
Please "Like" My Photo!
Once you've made some cool underwater shots, you would love to have more people notice your photos, for example by sharing them on Facebook. A path full of potential but lots of nasty obstacles on the way. Let's have a look!
-

Reef-Art: Looking at the Reef...
Reef-Art shows fascinating insights to an underwater world, 99% of the divers never see. Reef-Art is the "Fine Art" of macro photography. It's a passion! The passion to bring your audience something they don't expect, they h...
-
Underwater Photography: Shoot...
Are you ready for huge perspectives in your underwater photographs? Wide-angles are fine but do you want it even wider? Time to check out underwater panorama photography!
Load more comments