-
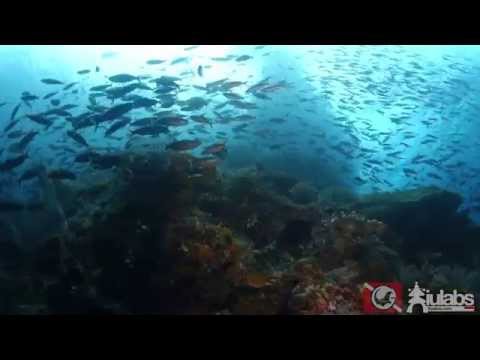
Raja Ampat - Heaven on Earth
Raja Ampat, a piece of heaven on earth granted by God. Witness the magical beauty of the nature has to offer in these islands, located in Papua, Indonesia. I brought this video with the message to always remember to protect our environment out of the greed of natural resources exploitation. It was a 10 days long trip on MV Temukra, a vessel operated by one of the oldest and well known live on board fleet cruising the Raja Ampat waters, Grand Komodo. We spent 3 days around Misool Islands and continued up north towards the end of the trip. I would like to thank Grand Komodo and MV Temukira crews (Cap. Arman, Om Jemmy, Bli Made, Om Komang, Chef Iwan, et.al.) for the amazing 10 days experience, our dive Buddies from Taiwan, CY, and Ardi, also for lending me his aerial footage. Please note that I do not own the copyright of the music used in this video. Credit titles have been made for the music used in this video. Special thanks to Grgoire Lourme and Evan Lee NY for their musical art. Underwater footage and on board footage is taken by using: Sony RX100M2 Nauticam NARX100II 67mm URPRO CY Filter Inon UWLH100 wet lens Subsee +10 diopter Inon UCL165 (courtesy of Ardilles Tarukpati) 1x 2,400 lumens i-Das Video Pro6 light Gopro Hero4 SRP Filter Ardilles Aerial Footage was taken by using: DJI Phantom Gopro Hero 3 UV Filter -
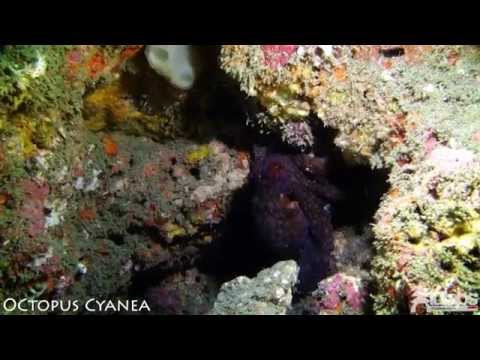
The Critters Symphony
Underwater macro video version from my recent Bali Dive Trip in Padang Bai and Tulamben Area. I don't own the copyright of the background music: Song: A Walk in Paris Artist: Gregoire Lourme All footage belong to me, taken by using: Sony RX100 Mark II in Nauticam NA-RX100II housing Subsee +10 magnifier i-Torch Video Pro6 lights Gorillapod -
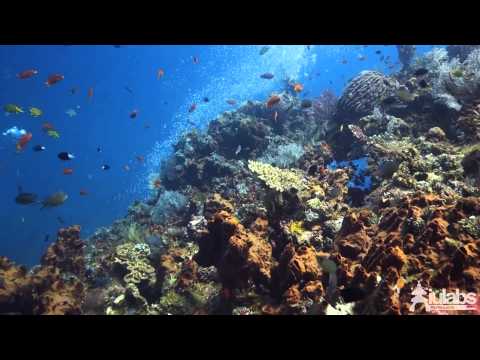
AHPDivers Tulamben 2014
A very short one day trip to Tulamben Bali with my office colleagues, AHP Divers (Bang Alan, Mas Yanu, Bang Harun, Angky, Indy and me). Sites: USS Liberty Emerald Tulamben Tulamben Drop Off All shots are in in HD format 1920x1080i. taken with Sony RX100 Mark II with Nauticam NA-RX100 II housing, URPRO CY Filter, 2 F.I.T. Pro 1200 lumens video lights, Wide Angle F.I.T. UWL07 Music: Lighting Soul by Epic Soul Factory I do not own the copyright of the background music, credit goes to Epic Soul Factory. -
![(Lembeh, Malalayang) North Sulawesi - A Macro Essay [HD1080]](https://img.youtube.com/vi/sYyLLySA4d0/0.jpg?id=video_1_8927_sYyLLySA4d0)
(Lembeh, Malalayang) North Sulawesi - A Macro Essay [HD1080]
Another video I have made, highlighting the diversity of marine life around the dive sites in Lembeh and Malalayang. All videos are taken by using Canon G1X, WP-DC44 standard Canon Housing, Subsee +10 diopter, 2x1200 lumens F.I.T. video lights and 2400 lumens iTorch Video Pro-6. The title ownership of the songs used in this video does not belong to me. I have credited each of the songs used in this video. -
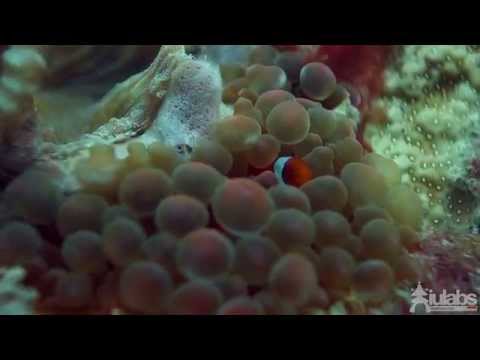
Pari - A Macro Life
Underwater macro videos taken in Pari Island, Kepulauan Seribu. Footage are taken from February - June 2014. Taken by using: Canon G1X Mark I Sony RX100 Mark II 2x 1200 lumens F.I.T. video lights 2400 lumens iTorch Video Pro6 Subsee +10 diopter Audio by: The Secession Studios www.thesecessionstudios.com Tycho www.tychomusic.com Special thanks to: Gelembung Samudera -
Raja Ampat - Heaven on Earth
Raja Ampat, a piece of heaven on earth granted by God. Witness the magical beauty of the nature has to offer in these islands, located in Papua, Indonesia. I brought this video with the message to always remember to protect our environment out of the greed of natural resources exploitation. It was a 10 days long trip on MV Temukra, a vessel operated by one of the oldest and well known live on board fleet cruising the Raja Ampat waters, Grand Komodo. We spent 3 days around Misool Islands and continued up north towards the end of the trip. I would like to thank Grand Komodo and MV Temukira crews (Cap. Arman, Om Jemmy, Bli Made, Om Komang, Chef Iwan, et.al.) for the amazing 10 days experience, our dive Buddies from Taiwan, CY, and Ardi, also for lending me his aerial footage. Please note that I do not own the copyright of the music used in this video. Credit titles have been made for the music used in this video. Special thanks to Grgoire Lourme and Evan Lee NY for their musical art. Underwater footage and on board footage is taken by using: Sony RX100M2 Nauticam NARX100II 67mm URPRO CY Filter Inon UWLH100 wet lens Subsee +10 diopter Inon UCL165 (courtesy of Ardilles Tarukpati) 1x 2,400 lumens i-Das Video Pro6 light Gopro Hero4 SRP Filter Ardilles Aerial Footage was taken by using: DJI Phantom Gopro Hero 3 UV Filter
Making Your Own Entry Level Underwater Video
Most of the times, the best way to share stories about your recent diving trip to your friends and family is to show pictures or videos. And yes, when you are about to share them, you just want to show them the best pictures you got. There is nothing wrong with that, but sometimes, you just feel as bad that there is so much more to tell from your recent trip.
Personally, I am a holiday diver with little time to spend in a year, so I bought a pocket camera with HD video mode. Soon I began to to grow on taking videos rather than taking pictures and starting to learn how to edit, make a simple story line, put some nice music in it and finally rendering it into a short video; you know, just for the sake for your own collection.
However, although its a personal collection, I always wanted for everyone to enjoy them, and to share that feeling I had when I was diving and experiencing those great moments underwater. Here are some useful tips for making entry level diving videos.
1. The Right Camera
These days, shooting videos is not as complicated at all. Most still and compact cameras offer full HD video mode and even some are equipped with manual video mode. There are also action cameras such as Gopro available in the market.
For me, having a compact camera with a full HD video mode and a big censor is enough to make a good entry level video and having a Gopro as a backup is a “nice to have”. The reason why I choose my compact camera is because:
- (a) it’s compact
- (b) it’s bigger than action cameras hence it will give you more stable stance while recording videos
- (c) recent compact camera housings have a standard 67mm thread for use of wet lenses, which means you can bring your macro and wide angle wet lens in your pocket and shoot macro or wide angle in one dive; (
- d) the battery shall last for atleast 3 repetitive dive; and also
- (e) you can do photography and videography at the same time.
Just remember when you are trying to buy one, check how big the censor is, the focus speed and focus length, and the white balance capability.
Online reviews are always helpful, so be sure to at least “Google” it. The price of the housing might hurt your wallet, but I am pretty sure if you purchase the right camera and housing, it will be a long term investment.
2. Accessorizing
The accessories really depends on your choice. Bringing down too many accesories doesn’t mean always good. For me, the basic accessories are 2 video lights (each 2,800 lumens), color correction filter, and wet lenses. Of course you will then need a tray, and a set of arms for the video lights and a wet lens adapter if your housing does not have any 67mm thread on its port.
Some macro video shots use DIY or available on the market tripods.
If you are new at this, I suggest you start only with the camera and housing first to familiarize yourself with the setup and how far can you push your camera’s capability, especially its white balance capability and its lense capability.
The best way to know what kind of accessories you need is to know your camera first, otherwise, you will be spending a lot in buying accessories which at the end of the day, doesn’t make your diving easier or more fun.
3. Creating Your Story
When you are all set to go, the next question is how do you want to make your video? It is both an easy and a hard thing to do. The best way to do it is always to do a small research on the place you are going to dive. Reading some reviews and checking out videos that other divers made always gives you a good idea.
Done that and still stuck? The most simple thing to do is that to look for a music first for your audio background. I personally like to use free cinematic musical scores or lounge or new age musics. There are lots of them available online these days. Just remember to put a credit to the owner of the song at the end or beginnig of your video.
When you have found one, try to listen to the music while watching available videos and imagine how your video will be. This is always how I made my videos until now. If you are still not sure, try to have some backup music for you to choose after the dive trip is done.
During the trip, it is not impossible to bump into someone else who is “video-ing” as well. Sometimes it is also fun if you can manage to collaborate a video so that it would add something new. An example is my latest video in Raja Ampat, Indonesia, I colaborated the aerial video taken by my dive buddy and the underwater video from my camera. Making it an all-round video for the topside and underwater.
A simple rule to a storyline is to have an introduction, the main part, and an credit title. A simple introduction may as simple as “Bali Dive Trip” or “Diving in Bali”, which you can simply put it on a black background or film some land shots for introduction as well as ending.
4. Shooting Footage
How long your video would be depends on your preference and how many good footage you have. As a non-professional, I have learned that a compilation of 3 to 7 seconds video footage is best for a short video.
If a shot is longer than 10 seconds, it may be a bit boring to watch. Based on what you have researched, try to put the highlights of the dive destination. Always ask your divemaster or the trip director on board about the highlights of each dive sites before the dive. Other than that, shoot as many as you can.
The ocean offers billions of surprises, even if you are diving in the same spot. There are always moments where you find unusual stuff or cool moments. Doesn’t matter if you are not using most of them since you can always keep them as stock footage. Just remember to look for good angles since you are basically free to maneuver underwater (so long you maintain your buoyancy).
To get a nice 3-7 seconds footage, try to shoot a 10 to 30 seconds video and try different angles. Sometimes it doesn’t matter if you are recording a single cut for more than a minute if it’s worth waiting. Once you got it, remember to do a quick review on the footage before moving on. Just remember when you got what you want, you need to know which part of the footage you want to put into your video.
Another crucial point in shooting underwater is that you need to be stable while filming. You don’t want your friends to feel dizzy when watching your video. Try to kick slowly while filming and to have a good buoyancy skill. This is also very helpful while approaching marine life without scaring it away.
Being streamline also helps you to film a stable footage. Depending on your actual diving condition, a little shaky is fine if you are filming under a strong current. Also, remember to pan slowly while filming a moving object or at least try to pan within the same pace of the moving object. It is always nice to have a dual handle tray for your camera so you can hold your camera with both hands and reduce shaking videos.
Filming macro is a little bit different. It will be almost guaranteed that there will be shaking in your footage if you are holding the camera with your hands while filming macro, especially if you are using macro wet lens. Some professional underwater macro videographer use tripods. With this, you may get a steady shot for macro video. However, always remember to minimize contact with the bottom as it is always our rule of thumb as a diver.
5. Editing and Post Production
After you got all the footage you want, the next fun part is editing. As a start, there are lots of movie editing software available on the market these days. I use Adobe Premiere to edit and render all my videos. My camera produces a 1920x1080 HD video in AVCHD format and I always render all the videos into HD .mp4 format.
What I usually do when I start the editing process is to compile all the imported files (footage, music, logo, etc.) into separate folders in the Adobe Premiere (it is always useful to move all the footage into separate folders after 1 day diving). The important part starts here, you need to visualize your video with the music you chose earlier. Every music has a tempo, by listening to the tempo, you can decide how long your footage will be before transitioning to the other one and whether or not you want to use transitional effect between footage.
The following is one of the most painful part, color correction! One quick way is you can apply your color editing to all the footage. But I can’t guarantee the results as each footage was shot in different condition.
What I always do (although painful) is color editing each shot one by one. Now at this point, there is a mixed opinion on whether to have a beautiful color on the footage or to have it exactly the same when you see it during your dive. We all know there is not much of color we can capture, if it’s beyond 20 meters depth. But again, color editing is something of your own personal taste. You will find along the way how would your color be best made in your video.
When you are all done, don’t forgot to put titles, who you were you with, music credit, and copyright signs so that you would at least avoid copyright issues when you upload your video in the internet.
All in all, there is all I have to say. There is always more to explore and to learn about the depth of the ocean. I hope this piece of article useful for you in your adventures and looking forward for your share of your awesome dive trip!
Cheers from Indonesia and dive safe!
Hafidz

Featured Posts
-
Please "Like" My Photo!
Once you've made some cool underwater shots, you would love to have more people notice your photos, for example by sharing them on Facebook. A path full of potential but lots of nasty obstacles on the way. Let's have a look!
-

Reef-Art: Looking at the Reef...
Reef-Art shows fascinating insights to an underwater world, 99% of the divers never see. Reef-Art is the "Fine Art" of macro photography. It's a passion! The passion to bring your audience something they don't expect, they h...
-
Underwater Photography: Shoot...
Are you ready for huge perspectives in your underwater photographs? Wide-angles are fine but do you want it even wider? Time to check out underwater panorama photography!
Load more comments
Joanna Lentini 3/28/2015 10:27:50 PM great videos ;o)
Hafidz Nasution 5/28/2015 7:57:41 AM Timur K., Hi Timur :) It's been a while .. and thanks for your comment .. it's certainly a good idea, I did try your advise and it feels more fun to do that, and also I manage to get a lot more stock footage than usual .. :) Just posted Manado Magic and Manado Macro , taken from my latest trip to North Sulawesi Will be writing review soon! Cheers & safe dive :)
Hafidz Nasution 5/28/2015 7:58:03 AM Joanna Lentini, many thanks for the compliment Joanna :)